

QuickBooks is fast becoming a leading provider of invoicing systems for small businesses, including those who are freelancers. Their system is easy to use and cost-effective. In addition, QuickBooks allows you to manage all your business finances from one location, a really important part of being a business owner.
However, there are times when those who are using QuickBooks are confused by the system and struggle to use it. Therefore, in this article, we are going to tell you how you can edit the invoice template in QuickBooks. We will also detail how Indy can help business owners take charge of their businesses with ease.
Understanding QuickBooks Invoice Templates
When you start using QuickBooks for the first time, you can create a QuickBooks invoice template. This template can then be applied to every invoice that you use later on. Creating an invoice template in QuickBooks isn't challenging.
The default QuickBooks invoice template
There is a default invoice template that you can use on QuickBooks. It is relatively simple, with only the basic invoice information that is essential for sending it to clients. It doesn't guarantee that your business logo will be on the invoice template, and clients can normally tell that you have just got the basic invoice template.
However, the generic invoice template in QuickBooks is there for those who don't have the time or skills to edit an invoice template and make it look professional.
Why should you customize the invoice template?
When you use a customized invoice, you're providing a new experience to the customer. The first thing that you can do is brand the invoice. Therefore, you can provide a clear indication of who is sending the invoice and what the work was that was done.
In addition, an invoice is an excellent opportunity to sell to your customers again. You can use tactics like offering additional services, an upgrade on what they have, or reminding them that you would love to work with them again.
Also, when you use a custom invoice template, you can build a better invoice number system that can be better for your records.
Accessing the Invoice Template in QuickBooks
One of the stumbling blocks of changing the invoice template is how to access the templates and make changes. Here are step-by-step instructions to make it easier.
Step 1 - Open QuickBooks
The first thing to do is open your QuickBooks account. Then click on 'Lists' in the menu bar and select 'Templates'. In this section, you will be provided with a list of all your document templates. You will see that all your invoice templates will be grouped.
Step 2 - Open an invoice template
Now you need to right-click on the name of any of the invoices unless it is the new template. This will open a menu bar where you manage templates and can choose which template you want to make default. If you're looking to create a new invoice template in QuickBooks, then you need to select the new invoice template option.
Step 3 - Open the invoice template to make changes
Now you can open up the invoice template and make changes.
Step 4 - Save the template
When you've finished making the changes you want on the template, you can then click 'Save' to protect your changes. Go back into the list of templates on your QuickBooks account. If you want to see how your template will look to a customer in paper form, you can click 'Print preview'.
Step 5 - Deactivate other invoice templates
Now you want to deactivate all the other QuickBooks invoice template options from the list. To do this, right-click on each of the templates in the list, and then select the option 'Make template inactive'. Do this for each QuickBooks invoice template that you have and no longer require.
Different Template Options
There are numerous template options available in QuickBooks. These include:
Standard Invoice: Most freelancers will use these as a way to inform clients of what they need to pay.
Credit/Debit Memo: Used to demonstrate how much is owed by one party to another.
Mixed Invoice: A mixed invoice can include positive and negative entries.
Prepayment Invoice: An invoice that notices a payment has already been made for some work.
Withholding Tax Invoice: Serves as a record for when you remit withholding tax from the local tax authority.
Expense Report: Used when an employee spends money that the company has to reimburse.
PO Default Invoice: Records the difference between an old order and the current new purchase order.
Quick Match Invoice: Used to save time when there is a large volume of invoices that do not need to go through validation and default processes.
Recurring Invoices: Periodic invoices that are sent out automatically, normally for retainers.
Customizing Invoice Templates
Now it comes down to customizing the invoice templates in QuickBooks. It is a relatively simple process that doesn't take long. Here are some of the features and facts that you need to consider.
Exploring the template design editor
The first thing you need to do is explore the invoice template editor in QuickBooks. It is a rather intuitive system. There are so many different ways you can customize invoices on the system to help you stand out from the crowd.
QuickBooks invoice templates can be changed in numerous ways. For instance, you can add/remove your logo, change the position and appearance of the company name on the form, change the contact information and move it into a new position, adjust the invoice title and invoice number location, and amend/remove fields.
In addition, you can also add special sections. You might want to include legal disclaimers or a remittance tear-off section. Or perhaps you want to create a personalized template where you create notes for the customer.
And you can change the fonts and color scheme so the invoice matches your specific branding.
Modifying the layout and structure
QuickBooks Online doesn't provide you with complete control over the layout of invoices or the ability to completely change invoice template settings. However, there are six templates that you can choose from. Therefore, you can select one of those options for your QuickBooks invoice and see which layout you like the best.
From the Lists menu, select 'Item List'. Then you can select the item that you want to delete. From the menu bar, you can then select 'Edit' and then 'Delete items'. This can be used for any fields, columns, or sections.
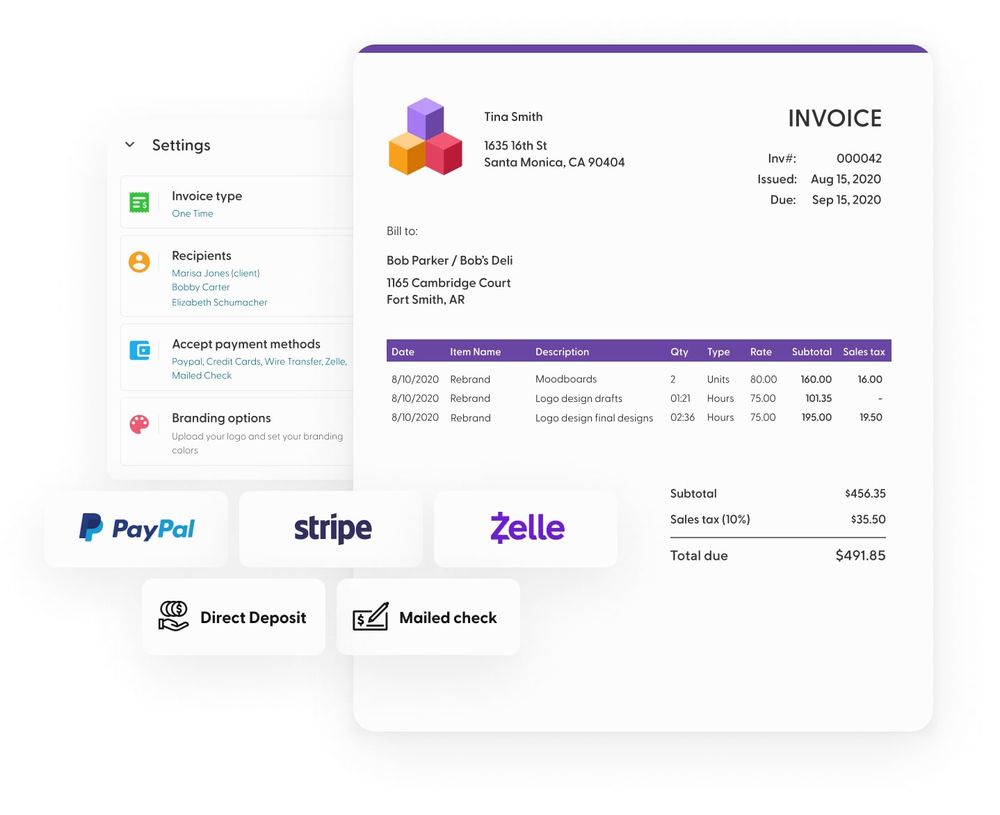
Customizing branding elements
To add your logo, you can go to the Design tab. Then you can select the option to 'Add your unique logo'. Select the box with the Add a logo +. Click on the + sign. Then you can locate and select the image you want to use. Remember to select 'open', otherwise the logo will not be on.
If you want to make changes to the color scheme on the invoice, you can click on the 'Splash on some color' or 'Try other colors' on the invoice editor. Then you can choose from 18 different standard color scheme options. Or if you want to have a unique color, you can use the HEX color code to have a unique color.
For fonts, select the option 'Get choosy with your font' or 'Select a different font'. Then you can select from four different font families and three different sizes.
Adding personalized content
There is also the option to add personalized content to the template. In the two invoice customization preference screens, there’s content and emails. To customize the content, click on the pencil icon in the gray area. Then edit the important details, such as business name, phone number, email address, etc.
You can then personalize the email template that sends the invoice. For instance, you can personalize the reminder email, add specific subject lines, greetings, and more. You might also want to add a personalized template message for every customer.
Incorporating advanced features
Now you can add advanced elements to your invoice. For example, you can add custom form styles, customer transaction numbers, and other details. You can also add in calculations and other options.
To add a payment link, go to your template and then select the 'Content' tab at the top of the screen. Then click on the footer area of the invoice, which can be found on the right-hand side of the screen. Click the 'Copy' button and paste the link into the footer with a message to the customer. QuickBooks online should have the payment link for your invoices saved.
You can also add payment terms to the footer to ensure there is no misunderstanding.
This can be checked by clicking on 'Preview/Print' at the bottom of the screen.
Previewing and Testing the Edited Template
At any point, you can check and test your edited template. To test the printed version, click 'Save' and then print the invoice using the menu. Or you can click on the print preview option to view what the customer will see.
Additionally, you can email a test invoice to yourself. Then you can test all the invoice features, such as the payment link and other items.
You must test your invoices. You want to look professional, and having an inaccurate invoice can sometimes mean that you don't get work again or payments are delayed.
Saving and Applying the Edited Template
Once you're happy with the template, you should look to save the template. A button at the bottom of the screen displays 'Save'. Once you've saved the template, it is stored in a central database on QuickBooks Online. You can access, modify, use, and delete any template you wish there, as we discussed earlier.
How Indy Supports Freelancers
For those who are running a busy freelance business, working with invoices can be a time-consuming process. That is why having an invoice template in QuickBooks can be such a great option. However, Indy also knows there are many other tasks to complete when you work for yourself. That is why apart from a powerful invoice tool, they offer a suite of excellent tools to streamline your business processes.
- A CRM system allows you to save the important contact details of clients and prospects.
- Invoice templates help you send invoices to customers and get paid faster with a range of payment gateway integrations, without additional costs.
- Access to a wealth of knowledge in the Indy University information.
- A work management tool helps you schedule work and ensure you meet deadlines.
There are so many tools on Indy to help you make the most of your time. With Free plan and competitively priced Pro plan, you can be sure you get a good deal for your needs, without having to pay a fortune.
Conclusion
Customizing invoices is really important. You have to ensure you have all the important information on the invoice, such as the invoice date, contact details, itemized work, and more. Changing the invoice format is easy to do with QuickBooks, and you can get paid faster when you have the right knowledge behind you.
In addition, you can use Indy to help you manage your freelance business. They offer you two pricing points, free and paid, which can help you manage your business, invoices, and workloads. Try Indy for free today!